Showing posts with label How to. Show all posts

Friday, May 11, 2012

How to: Motorola Android Phone Hard Reset


Motorola DROID Android Phone (hard Reset):
1. HARD RESET can be done via Menu-> Settings -> Privacy-> Factory Data Reset-> reset phone

2. To FORMAT the phone is off press the “POWER X” on your keyboard simultaneously. And then disconnect after a while.

When performing a menu screen, hold the VOLUME up and CAMERA. ANDROID OS RECOVERY menu appears, point "D-pad cursors to
Go menu TO Data "-> Factory reset -> then press the center D-pad cursor to select YES.


Motorola DEXT Android Phone (hard Reset):
1. press and hold "button CAMERA" "when activating the phone", then press the "VOLUME down button" to enter the menu "RECOVERY Mode".
2. Recovery mode on the menu, "press ALT and L" for resetting and "press MENU and BACK" to reboot.


Warning: I am not responsible, if there is damage to your android phone, or data on your android lost, when doing soft reset or hard reset. So if you are unsure do it, do not do it, come to the service center in your city

All HTC Android Phone Hard Reset


HTC DREAM G1 Hard reset:
1. to "soft reset" if you have a "hang or Frozen" simply turn off cell phones, loose battery set aside some time and plug again.

2. To Hard reset, press the "HOME MENU and POWER menu" simultaneously for about 25 seconds.

You will see a picture of a yellow triangle on the bottom of the screen.

3. Press ALT and L, then press' ALT and W "together to begin the formatting process.

4. Press the HOME and BACK, for 25 seconds. Then the phone will do the RESTART which means that the format has been completed


HTC MAGIC Hard reset:
1. press and hold the “HOME and BACK button" together when the phone is off.

2. Then press and hold the “END CALL and the POWER button simultaneously while still pressing the HOME button keypad and Back simultaneously.

3. Release the button "HOME keypad and BACK "when shown a picture" ANDROID for three times ", then press Track the ball


HTC Droid Eris Hard reset:
1. Press and hold "key down and key VOLUME SEND" simultaneously.

2. Then press the "power button". The next phone will be listed in the instructions for this process.


HTC HERO Hard reset:
press and hold the "BACK HOME keypad buttons" are switched off simultaneously. Then press and hold "END CALL and Power" simultaneously.

This process only a few seconds, wait a few seconds until the RESET process is complete, then press the MENU button.

Thursday, May 10, 2012

Install Java Applications On Android

Install Java applications on the Android (Convert jar to the apk) - much in use java applications on mobile phone features, different from the mobile OS that uses its own extension sample android application. Apk

Starting from a desire to try to install java app on android, apparently normal java application installed on android using java compiler App Runner.

Before installing java applications in conserves first to .Apk . for conversion to regular java application to do here; use one of the options for your source file option if it has an example file. Jar then select the option Choose the jar file to upload, to advance the parameters adjust his or her phone and then click Get Apk wait while the conversion results. Apk

after successfully downloaded to the converted java applications. Apk ready on the run

So on Install Java applications on the Android (Convert jar to the apk) may be useful

Tuesday, May 8, 2012

Change Google Accounts in Android

If you buy with the Android operating system, usually a Gmail account is required to access any Google based applications like any market, but if you have a Google account disable and enable you to switch accounts, it is the way.

Here are steps to remove an existing Gmail account
HH you are not in ROOT?
There are several steps, including:
1. Factory reset
1.Go to settings -> Privacy -> Factory Data reset

2. Clear Google Data APP
2.1 Go to Menu -> Settings -> Application -> Manage Application
2.2 Locate and select the Google Apps -> Clear Data
2.3 When the message "All information you've saved in this application will be deleted Permanently", select OK
2.4 Return to Settings, go to Synchronize Data
2.5 Wizard will appear to enter a new Google account. This wizard appears when we just bought a new android handset or when we just did a wipe through hard reset.

For more safe, when to change the Google account, Clean Data Cache also in Mail, do go to Settings -> Applications -> Manage Applications -> Gmail. Click the "Clear data". In order to process the email synchronizes not have a problem.

Note: This method is not applicable to all android HH


HH you’re in ROOT?
If you are in the ROOT HH, then you can use it without having to reset under factory

1. Use the explorer or explorer root can access the system (egg ES File explorer).
2. Insert the data / system on the phone
3. Delete the file "accounts.db"
4. Once removed, please in-Restart / Reboot.

Monday, May 7, 2012

Control The Android Phone From Your PC

Control the android based phones, one of them by using the application "Droid VNC Server". When you are done Rooting on your android phone, so many interesting applications that can be found, including the application of "Droid VNC Server" to control the (remote) android phone you interactively from a computer / laptop.

There have been many applications to perform remote control of the android phone on the computer, but the "Droid VNC Server" is the most interactive applications of remote application android applications outstanding at the "Android Market".

Some advantages of using this application are:
1. can access the android phone without any contact with your phone

2. Could easily make a screenshot for specific purposes

3. The process can be faster screenshot

4. Accessing the phone when you are working or in school, but you want to access remotely your android phone.


Of the excess surplus, will be presented here remote "android phone" with program "Droid VNC server" artificial oNaips from XDA forum. Droid VNC Server is a small program that is being developed in beta (so there's some bugs in it). Although there has not been an official announcement about the development of a new program (from oNaips), Droid VNC Server program has been running well and have not seen a disturbing problem. Android phone brand to brand can use this program can be viewed directly to the manufacturer's website (oNaips).

Well, now we begin to move a step in realizing your android phone remotely from a PC / computer:


Step 1. Preparation of the PC / laptop: Download here
you should make sure that the VNC Viewer is installed on your PC

- Linux: Either through the Remote Desktop Viewer (via the command prompt can also be). Remote Desktop Viewer commonly found in the standard Ubuntu instalasi

- Mac: You can use Chicken of VNC program

- Windows: You can use Real VNC

Look for a line with your OS (android viewer to control your server is to be controlled from the android)

Step 2. Preparation on your Android phone:
- Open the android market from your phone, find the application called "droid VNC server beta" and install to your phone.

- Open the program Droid VNC Server, and click / tap "Start Server"

- Better Wifi network to connect your Android phone into the computer where the Access Point you want to use for remote connected (in a network). Because until now have never tried to do a remote from the Mobile Carriers 3G networks.

- Setting your own on the "Menu> Settings" (use the facility for security settings password on your android phone)


Step 3. Remote start your android phone from the PC:
- Open the VNC Viewer on the Laptop / PC , type the IP and Port that you can see on display Home program Droiv VNC Server (on your android phone)

- Type your password (if settings Droid VNC Server password you have it)

- With these steps, you should be able to begin to connect to remote your android phone


the trick to perform remote via USB cable:
With a USB cable, it will be faster in her remote your android phone, provided you have already installed (install) the ADB in the Laptop / PC and your phone is connected via USB.


Type this command at the ADB shell:


adb forward tcp: 5901 tcp: 5901
adb forward tcp: 5801 tcp: 5801


With VNC Viewer to connect (connect) to:
local host: 5901


Some Things to know:
1. (Control keyboard in VNC Viewer):
   The error:
   = A +
   ! a ~
   ~ To 0
   <A *
   > To #


2. Phone function keys on the keyboard:
   home = home
   right-click = home
   pg up = menu
   pg down = call
   pg down long press = redial most recent
   esc = back
   del = back
   end = phone sleep
   typing on the home screen = typing in the Search on your android phone


3. Android ROOT you will be required in the position to be able to use this way, and should be installed busybox also


4. Not all ROM can support this application (but most of the ROM and the device can)


5. To make arrangements should PLEASE READ INSTRUCTIONS on such arrangements in advance


6. If you are still confused please read here

Sunday, May 6, 2012

Android App: Bravia Engine On Android Phone

Q: What is the Bravia Engine?
A: An application of technologies that made Sony TV’s in their products and now come in a handheld device Sony Ericsson Xperia series. With this technology users could feel the sensation will display a very clear and sharp. And what if this technology can we put on the "Android Phone, instead of Sony Ericsson?"

Follow the steps below:

A. Just in case it is better first backup important data with Titanium Backup.

2. Make sure you are in a state HH rooted, as it requires root access to the system

3. Has a root explorer (file manager who has access to the root system cnth: Root explorer; ES File Xplorer; etc.)

4. Download Bravia Engine the file here
5. Extract the file Bravia Engine.zip, then copy and be_movie be_photo file to / system / etc

6. Set permissions to rw-r--r-- (press and hold the file then search options Permission Set), do this in both files (be_photo and be_movie)

7. Find files that are in the folder build.prop / system

8. Select and hold the file, then select Open in Text Editor

9.Gulir to the bottom line and add the following command.
                           # BRAVIA_HACK
                           ro.service.swiqi.supported = true
                           persist.service.swiqi.enable = 1

10. Press the Option key and select Save & Exit

11. Reboot the Android device

Create Dual Boot Android and Windows Mobile, Here's How

Create a dual boot android on your phone, this time I will tell you how, the android and windows mobile, so that your phone will be two in the OS, but not all phones, there are also phones that do not support with this, the following steps:


# Step 1
Prepare a compatible mobile phone to dual boot
include: HTC Blackstone, HTC Diamond, HTC Diamond-500, HTC FUZE, HTC Raphael-800, HTC Raphael, HTC Rhodium, HTC Tilt2, HTC Topaz, Sony Ericsson Xperia 1

# Step 2
Partition SD Card


# Step 3
Use the SD Card with a capacity of at least 2 GB
In order to reserving the first partition of 512 MB and use the android as a label
To create as .. Change it to primary, while for use FAT32 file system

# Step 4

Leave the second partition of 128 MB and use the name for the label ext2
To create as... while for the change to primary use ext2 file system

# Step 5
The third partition reserving 64 MB and use the name for the label ext2
To create as .. while for the change to primary use Linux swap file system

# Step 6
Wait approximately 2-3 minutes until the updating process will be completed soon, which means
Subsequently OK to terminate the

# Step 7
Download android file

# Step 8

Extract and copy to the root directory on the SD Card
Npkinstall go to the folder then select a text file whose name is the same as the hp then rename it to startup.txt

# Step 9
Back to previous folder
Open the startup folder, select the folder whose name is equal to hp
Open the folder startup.txt copy files in the folder and then paste in the previous folder

Step # 10
Remove the SD Card from the card reader and insert into hp

Step # 11
Through the file manager on the phone (windows mobile)
Open Storage Card
Go to the folder and select install.exe npkinstall
Wait until after the phone will restart by itself

Step # 12
Open the file manager on the phone (windows mobile)
Open Storage Card
Select haret.exe
Wait a few seconds then android will appear

I also have not tried because I have devices that do not support, but I've done this on android phones and successfully, (remember, I am not responsible for any damage that occurs if there are mistakes you did in the process of creating a dual boot on this android). But if you do it right it'll work, home compatible device to dual boot windows mobile and android

Saturday, May 5, 2012

Android: Upgrade V6 Supercharger

This super charger in it a lot of script to "tweak android" us. but we will discuss V6 supercharger is about optimizing the android that not lag anymore ...
just:

Download: Download V6 superchanger
after download, the next steps:

• rename it, ". Pdf" behind it deleted> let me be. "Sh" behind
• Step use the terminal emulator:
1. place the script in the "sdcard /"

2. rename script so the name short and simple, for example. direction so rename "V6RC4.sh"

3. into the terminal emulator, type
su <enter>
cd sdcard / <enter>
sh V6RC4.sh <enter>
the script will run.

4. will be the way the script, select 1 for the fast.

5. Later there is a menu option 21 1-31 .. >> type >> select yes.

6. then select the option no.6, there is a command to reboot select yes <enter>

If stuck in the boot animation, pull the battery and plug it again, turn on his mobile phone
1. After HH live, open a terminal emulator again .. type:
su <enter>
cd sdcard / <enter>
sh V6RC4.sh <enter>
the script will run.

2. 1-31 later in the option menu, type 18 (Engine Flush) type Y (yes)

3. type 20 (Nitro Lag Nullifier) continue to type 1 (install).

4. type 29 (restart your engine), then will reboot automatically.

DWOYR
Tested GALMIN all rom

Friday, May 4, 2012

Way of hiding files in android phone

Way of hiding files in android phone
Have a confidential file and want to hide in android phone without having to remove it if did not want to get caught.

File is referred to here can be images, video and so on.

As usual or as we know when we opened the gallery, it would appear our files we have stored. We can make it appear in the gallery. How do I? Follow the steps below:


1. Use a file manager that is on your android phone.

2. Create a new folder, create folders for file storage that we ought to be.

3. Name the folder with the prefix point, for example. .Secret .Hidden and so forth.

4. Having formed a new folder, move the file to the desired earlier. Secret earlier.

5. After that look at what happened when we opened the gallery, to be sure the files we wish to hide will not appear again in the gallery.

Congratulations, you have a bias to hide files on your favorite android!

Thursday, May 3, 2012

Android App: Create CCTV Camera with Android

How to Easily Create CCTV Camera with Android - Currently the use of CCTV cameras are needed for everyday needs whether it is in the home environment or in an office environment. If you suddenly need a CCTV camera when you do not have it, then you can use other devices such as camera phones Android.

This trick can also be used to test the reliability of the new Android phone you just purchased. In addition, you can also use it as a fun activity to fill your time is empty. Remember; do not use this trick for negative things because you yourself would know if the negative things can damage health.

Here are step by step how to use your Android phone as a so-called IP Camera with CCTV cameras.

The preparation phase:
• A fruit Android phone.
• A fruit that is integrated with Wifi notebook or a single PC that is equipped with a Wifi device.

Software Install process:
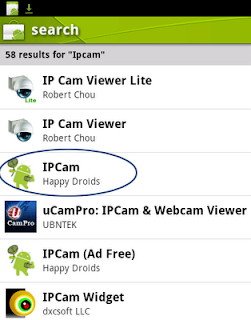
• Go to Market, search by keyword IPCam application and there will be some options. At the time of this experiment, we used the application made by Happy Droids that can be obtained free of charge.
                            
• Select the application and install it on your Android phone.


After the install is complete, it's time CCTV camera uses the IPCam as:
• Activate the Wifi Sharing Tethering on Android phones.
• Run the application IPCam had just installed.
• At the bottom of the left, you'll see a button with the letter (i). That is an indication of use of IPCam. Please read for a bit to understand how the camera works.
• In some key images. Option was to provide authentication if anyone wants to access the camera. For this experiment, for easy, clear the course of this choice.


-Choose a Quality setting to your liking. The better the Quality, access can be added later and vice versa, then the bad Quality faster access (Figure not broken).  this example, we tried 50%, the middle of the camera quality.

-On the size, select the size to your liking. It also depends on the phone, if the phone is not capable of taking high-resolution, not forced. In the example, we use the size 640 × 480 pixel size.

-Press the IP image on the bottom and enter the port you'll use. If you do not understand what a port, use only por 8000 (default port) and continue by selecting Save.

• Now, turn on the camera by way of "touch" on the bottom right of the button on / off.
• There you will see the IP address of the camera along with the port of the camera.
• At present, back to the notebook / computer, connect to Wifi with Android phones that have Wifi Tethering active Sharing.

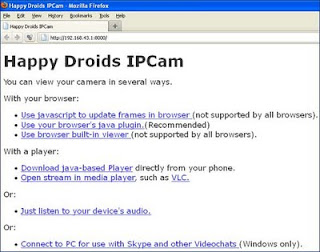
• After connecting, open a web browser and enter the IP address of the address as stated in the previous image. In the example, the IP address used is 192.168.43.1 with port 8000 then the browser address, write http://192.168.43.1:8000/


• If all processes are configured properly, you will see the words as shown below.
                           
Next select one of the methods that will use, whether choosing to use a web browser, media player or use the other. Please creativity. In the example, we use the Firefox web browser.

• Remember, not all web browsers support this application. To make sure that you use the most recent web browser or using media other than web browsers.

It's finished, now your Android phone can be used as a CCTV camera as a camera conventional. You can put it anywhere as long as the Wifi signal from Android to be accepted by the computer / notebook.

If using a web browser, make sure the computer / high speed for your notebook web browser requires a great resource when streaming video from the camera Android. Do not let your CCTV camera needs to be blocked just because the computer / notebook is slow.

In addition to using the direct sharing of Wifi, you can also use the Wifi network is available provided that both your computer and notebook alike can access the network. IP address of the Android also will follow the existing Wifi network.

How to speed up 3D renderings on Android

I will share about how to improve 3D graphics on the android. Before doing this you see the results beckmark at least 2x, after doing this again beckmark 2x see the results.

Graphics performance increase, the problem is:

Features of OpenGL are not fully supported and recognized, especially in the PowerVR driver, therefore the application should use the GPU (OpenGL) instead uses software rendering (CPU).

That can cause Lag and Slow.

HOW job it was simple just delete the files in the folder libGlES_android.so / system / lib / egl
do not forget the backup. If you do not want to delete rename wrote a libGlES_android.so.bak

here’s how:
A. Just delete the file "libGlES_android.so" in the folder / system / lib / egl.
2. Edit the file egl.cfg (open a text editor)
from:
o 0 0 android
o 0 1 adreno200

becomes:
o 0 1 adreno200

Or it could be the reversal:
from:
o 0 0 android
o 0 1 adreno200

becomes:
o 0 0 andreno200
o 0 1 android

(why there are differing "0 1 adreno200" there is "0 1 Tegra 2" and others, it depends on the type / model of graphics on its HH)


then save & exit
restart your android

After that see the results of 3D beckmark on your android, will definitely go up ..

Wednesday, May 2, 2012

Eliminate the Android Market Update, Here's How

Android Market and update your own? Market new android is to make us slow... and no update is usually the market will be replaced by itself! Following I will tell you (for those who do not know) how to disable automatic updates on the android market, android market that always look to the market the first!

How:
1. Find marketupdater.apk in System / app
2. Rename the file "marketupdater.apk" to "marketupdater.apk.bak"
3. Overwrite the new market at the old market later if the "force close" to restart it... (Install the old market)
easy not, here's how to create a new market to market long!
Download wait 5 seconds, click the top right corner of the skip

How To Root Samsung Epic 4G

Q: What's Rooting For?
A: To obtain full access rights to the software in a File System from android OS itself.

Q: I want to install pirated software, what do not need rooting?
A: There is no need

Q: Why Continue?
A: good for tweaking software to hardware settings that change the configuration of the plant stock. Such as overclocking, Voodoosound tweak, tweak GPU Chain fire. Etc.

Q: Danger or not?
A: well the procedure is simple, it’s almost idiot proof. Rich events not die from a light, battery discharged, pc hang etc... But remember rooting only a beginning, a key to customize further, and greater risk.

Q: I feel epic that I have been good, had a date to play all the games, media player, surf the standard conditions as well... so still need to be rooting?
A: nope forget about it... wkwkwwk ..:)

Procedure
First check the first application in the list there is such thing as "SuperUser" is not?
If there are means "Samsung EPIC" you already ROOTED.

If you do not. Could follow this tutorial

Download the file CWM 3.1.0.1 purple

OneClickRooted + ClockWorkMod Recovery

as the name implies, you live once all direct push installed to your Samsung epic, including CWM Recovery.

Instruction
1. Extract the zip to a folder
2. Ensure phone is in USB debugging mode and connected to your computer
3. Run the run.bat
4. Follow on screen instructions


still confused
just follow the following video tutorial...

Play PC Games On Your Samsung EPIC

Play PC games on Your Samsung EPIC

You can play almost any "PC game on your Samsung EPIC"... with the help of an application called 'Splashtop', working principle, similar to remote desktop with the response time and performance is very good, so it seemed to play your games on Samsung epic, even sound also straight out of your epic. Drawback of this application is not available onscreen game pad; fortunately we have the Samsung EPIC built-in keyboard so it can be used as a controller.

How it works, the games will be played on the PC if you are, then the display and input control directly at the show in your epic.

Requirements that you should prepare:
-PC-wifi connection to Samsung Epic
-PC powerful enough to play the desired game.
-Splashtop in Samsung-EPIC, Streamer splash in your PC

Download Splashtop for android
-looking at mobilism.org

-some games should be in windowed mode, control can be re setting, in the setting of each game.

Splashtop streamer for PC / Mac
Download here


Tuesday, May 1, 2012

How to install android application through PC

After you download android applications from the pc, here I will continue how to install android application after we download the android application via pc ,

1. Download and install the Android SDK and Android USB Driver on your PC.

Android SDK can be downloaded at : _http://developer.android.com/sdk/index.html
and Android USB Driver in : _http://developer.android.com/sdk/win-usb.html.

2. Change the setting on Droiders Android phone to allow installation of applications from other resources. On the menu> Settings> Application Settings> Unknown Sources. Then on the menu> Settings> SD Card & Phone Storage> Enable connection to USB.

3. The final step, open the Windows Command Prompt and type "adb install /. Apk".

4. Replace with the path leading to the APK file is stored and replace with APK file name, for example adb install C: angry birds.apk

5. Once the application is installed, Droiders Android phone ready for use

Android Apps Download From PC

Maybe you guys android smartphone mobile phone users are still confused or difficult to download via the market or now renamed Google in play, because the application is not compatible with android type we use, I have the solution:

through 3 different websites, that allow you to android application download with file extension. APK in seconds. And of course the download via PC Android phone instead of through us, 3 that application, sees below:

Android Freeware.org
 
Android Freeware Directory is a directory of Internet, which aims to collect and classify the free software and other freeware resources for Android based phones. You can download more than 1000 the GER

Free androidware.com
one of the largest directory of  Android APK with many themes, wallpapers, skins, apps and games / game.

Android Downloadz

Another great site with lots of downloads including the android APK, wallpaper, ring tones and utilities for the pc.

Monday, April 30, 2012

How to Install Android Application That is Simple And Easy

Buddy Android lovers, in this post I'll discuss a little about HOW TO INSTALL ANDROID APPLICATION. Lots of questions lately about the Android phone, the phone may smart phone Android phone that uses Android OS and make this gadget a little bit complicated in terms of its use. Android phone is actually not very difficult also to be used, probably because my friend is still new to using mobile phone

Android to Blackberry also I think there are few similarities in terms of how to install the application. Install the Android application there are several ways, and the way which I think is the most simple and easy to us directly downloaded through our Android Market. Each phone must have the Android Market Android provides Android Thousand Knick are provided free of charge, but there is also a paid application. Here's how to install android application is simple and easy.

HOW TO INSTALL ANDROID APPLICATION easy and simple.

A. Make sure your Internet connection is active and ready to explore

2. If Internet package you already inactive Android phone, now prepare yourself.

3. Before using the Android Market is already available on Android phones, you must create an email account.

4. Email account used to enter the Android Market.

5. Go to the Android Market is on the phone android.

6. Please browse and search for thousands of applications provided by the Android Market.

7. Select the applications you want to download.

8. Once the application is successfully downloaded

9. Then the command will be installed.

10. Completed.


Congratulations you to easily install Android applications without complicated to use additional applications. It's my experience How to install Android applications, there may be some ways more to be done to install Android applications. How to Install Android application that I have explained above, is how to Install Android application that is simple and easy.

Thursday, April 19, 2012

Here's how to install applications and games manually on Android

Maybe someone who'd just use Android phone, so do not get it right or not used, so still confused how to install applications and games on your Android phone...follow these steps on How to Install Applications Manual

Here's how to install applications and games manually on your Android Phone:
1. Download the application / game from the computer or laptop

2. Copy the file "apk" (installation file extensi apk) from laptop to your Android phone (preferably to a memory card in the folder / sdcard)

3. Open the application on the "android market and search for Astro"

4. Download Astro File Manager (free)

5. Run the install is complete Astro application

6. Go to the folder where to save files before installation, (if downloaded from the android is usually there in the folder / sdcard / download)

7. Click the file "apk" in question and the pop-up window will appear and select the open app manager

8. Click install and follow the next steps, if pop-ups blocked from installing its entry into the Settings menu and uncheck the Unknown Applications

so easy is it? Now you should know about "How to Manually Install the Application"

Monday, April 16, 2012

Android Battery Saving Tips

With so many activities in our Android phone, of course, very influential on Android battery life. Just like humans, do not use Android battery durability. There may be of some friend who needs to know the Android Battery Saving Tips:

1. Turn off Live Wallpaper.
Live wallpaper does look beautiful but it would be very draining Battery

2. Choose a color wallpaper dark / black

black will require a smaller energy flows from the bright colors.

3. Choose a color theme louncher dark / black.

4. Select display lighting level of the lowest.

5. Use a little Home screen
the more home screen will overload the processor and ram.

6. Use the widget minimum (choose which is considered the most important), the more widgets will be more and more applications running in the background,  will spend much ram the tip of his will to power Battery too.

7. Non Enable all animations.

8. Use 2G services (3G off)
Mobile is always looking for continuous network, if we're not in a good mobile phone network will put its energy to always look for the network.

9. Still nothing to do with point 8
Mobile put in place where signals can be received well. If the very low signal strength is better positioned on the flight mode.

10. Try to use Aplication which has a black background.Example: chat -> Trillian
browsing -> UC browser (night mode)
Facebook -> TweetDeck
sms -> hancentsms (with a black theme)
explorer -> astro / root explorer
etc...

11. More selective in which if the installed application will run in the background.

12. Non Enable Auto sync on the application or minimize the time interval in sync. Maybe a 15 minute interval is usually use in setting back to 1 hour or even longer.

13. Turn off the GPS, WIFI and Bluetooth when not needed.

14. Turn off vibrate profile and reduce the ringing sound. Vibrating ring and the large volume clearly requires considerable energy.

But what if we need a vibration at certain moments? During the field work for example. While still at home but we certainly do not need the vibrate or loud noises. Automate the solution is just to install the Auto Switch Profile,

15. Turn off the internet data connection when not needed. By installing APNdroid, Or Juice Defender (free in the market). But I personally recommend installing the Green Power Premium. For those who really want to save battery! Try looking at the android market is lightweight but complete application.

with this application we can set how many minutes / hours  connection, the data is open and how long the connection is open, this application has a night mode, so at night we have set the time of this application will enable all service disable the data connection.

(This application! cause we do not always conect internet so Push email service! Messaging Push, MMS will not normal walk)

strongly recommended!
A. Always Deadly Applications running in background with task killer task or Andvance Killer or the like.

Reason: System is a system in an intelligent android, he knows now where he needs a ram or not, if he needs a ram then he will automatically close the application that it is no longer needed.

Applications close by force (task killer) will only burden the CPU and ram when the application was re-ignited. This fact will make the battery run out quickly.

That is the underlying why no exit / close on most android apps.

Arguably still!
A. CPU Throttling or lowering the Processor Clock Speed. Usually with
Set CPU install (root). Until now drop clock speed of the processor is still debated in the forums whether it is effective android or no, there are some who regard this way can save battery instead say there is some sort of application is not useful and even make fast  battery runs out.

Reasons that support:
- By lowering the clock speed automatic electric energy which flows into proci will be smaller.

- Moreover, when we do not currently require large proci, for example, when the screen is off or in the middle of the night we were sleeping. At the time of course we certainly are not using the phone so what's the clock speed of 1 GHz?

Reject reason:
- Android is an intelligent platform, and since the emergence of enclair (2.1) has the ability management proci android, ram, etc. Battery better. When the phone is not used, the android will automatically lower its energy into proci.

- The application always sets CPU continuously monitors the current to the rated proci Battery instead will take a lot of the edges rather than save, but will increasingly become wasteful.

- Why should we buy an expensive android 1 GHz or dual core but instead we end up lowering ability.

Note:
- Tips above may be some who will least interfere with the comfort in wearing android, so it is good we are also able management our needs in "using Android".

Thursday, April 12, 2012

How to Optimize Performance Android Phone

How do I optimize my android phone? Android phones are not the same as other phones. Mobile phones with Android OS have its own sophistication. Then how and tips to optimize Android?

Many ways you can do mate, be it with the help of a lot of applications already available on Android Market or by optimizing the android tips below:

1. Turn off the animation screen (Settings: Display: Animation)
2. Disable the plug-in browser (Browser; Settings; Plugins)
3. Use a third party launcher such as LauncherPro or ADW Launcher
4. Turn off Live Wallpaper (Read: Android Battery Saving Tips)
5. Reduce the number of widgets and icons on the main screen
6. Uninstall applications that do not / almost never use
7. Reduce the frequency of data updates (Settings: Accounts)

Well that was simple tips how to optimize "your android phone".
Hopefully Helpful.